Showing posts with label images. Show all posts

Thursday, January 10, 2013

Tutorial: Adding Help Files to Skyrim's Main Menu

Object: Add Help files to Skyrim's main menu.

Difficulty: Very Easy

Time Needed: Besides the time needed to write the files, about two minutes.

What You Will Need:


  • The Creation Kit. The Creation Kit is the modding tool for Skyrim, and can be downloaded from Steam.
  • Some previous understanding of the Creation Kit (preferably).
  • The text for the Help file that you want to add.

There are a number of ways to add guides and Help files to your mod. The most common way is to use a book or a Message Box menu system. With the addition of MCM (Mod Configuration Menu) to the SkyUI,  it is now also possible to add them to your mod's MCM. 

This tutorial focuses on adding Help files directly to Skyrim's normal main menu. When you press 'Esc' ingame, you can save, load, read your journal, review your achievements, etc. There are also Help messages for guiding the player in how to use the game. It is possible to add your own messages to this list. To do this, two things need to be done:

1) Create a new message by navigating to Miscellaneous > Messages in the Object Window, right-clicking in the right-hand panel, and clicking 'New'.
  • Write or copy the text that you want to be read in the Help menu.
  • Make sure that the Messagebox checkbox is checked.
  • I suggest that you follow the naming scheme that the other Help Message have: "Help[Topic]Long".
  • Ensure that there are no Menu Buttons or Conditions. Click 'Ok' to create the Message.

2) Navigate to "Miscellaneous > FormList" in the Object Window and find the "HelpManualPC" FormList. Double-click to edit it. Now go back to the Messages category, select your Help Message, and then drag it into the FormList.


3) Save your plugin. Start Skyrim.exe and select your plugin from the Data Files. Begin the game, load a save, and press 'Esc' to test your modification. Navigate to the 'Help' menu, and look for your message. The Help messages are categorized alphabetically by the Message's name.


There you go! Your Help files have now been added to Skyrim's Main Menu.

Tuesday, December 18, 2012

Oblivionauts Cover Art

Cover art for our next modding project Oblivionauts has been released! Click to download!


Details on our upcoming project will be released publicly soon. Make sure and check back here or subscribe to this blog to receive any new updates we post. You can also follow us on Twitter or Google+.

Twitter: https://twitter.com/Woverdude
Google+: https://plus.google.com/u/0/b/113795600799397866390/113795600799397866390/posts


Tuesday, May 22, 2012

Assets needed!

In order to improve my mod and its presentation, there are a number of assets which I want to add. I am not an artist, however, and have no skills in image-creation, modeling, or animation. So, if you would like to help, below is a list of assets that I am looking for. If you want to help out, then please contact me (Woverdude). I will credit you for your work. If you would like to create multiple assets, then we can discuss small payment options. I can't pay you much, but if I really like your work and you are dependable, then I will try to reward you with something for your skill and hard effort.

Art:


  • A poster image for my mod. Something that captures the idea behind the mod and would be used as a front picture or advertisement for everywhere that I post about my mod
  • A retexture of soul gems to include different colors, including magical glows.
  • A new banner to be used ingame. It should have a red background with the image of a white moth in the foreground.
Models:

  • New Monk-themed armor for those who want bash their enemies' teeth in, but want to be protected while doing it. I would like to have both a heavy and light version, but I am not picky. It should not be skimpy, and should fit well with the customary fantasy-genre monk class.
  • New weapons. This could include brass knuckles, spiked gauntlets, katars, etc. They should fit in with the standard Monk class, and should be lore-friendly. Also, they need to function properly in the CK and have quality textures. Feel free to design it as a piece of armor that would have a weapon at the end. I can set it up so that it is a glove that adds to the amount of unarmed damage dealt.
  • New robes. Any kind as long as they are lore-friendly, fit the Monk theme, and are not skimpy.
  • Elemental robes. Unique robes that have the appearance of a certain element. One should look fiery, one should appear icy, and the other should seem electric.
Voice Acting:

Contact me for details. For now I only want one voice actor. You need to be male, have an adult (preferably older and deep) voice, and be easy to understand in English.

Wednesday, April 11, 2012

Google+ and Template Change

Google+


The Skyrim Modding Blog is now on Google+! Come take a look at our page and 'follow' us to get our latest updates.


Template Change


You may have noticed a change in the looks of our website. For some reason the Sidebar view was malfunctioning and messing up the post links. We have changed the template to the basic version for now.  We know that this look can cause lag because of the large amount of images and data that is displayed on one page, and are looking for a new template. We will either use a different default template, or create one of our own with a snazzy Skyrim background. Please have patience as we try to fix this issue.


[nox.fox update]


I've tested out some changes in the layout, I hope you'll appreciate them. I tried to keep things rather clean though it's not as minimalist as it was for the moment.
The wallpaper isn't definitive either as the image is a little noisy. I'll try to make a new clean wallpaper asap.

Tutorial: Leveled Lists, Part 1 - Adding Items

Object: To add objects to a leveled list

Difficulty: Easy

Time Needed: Less than 5 minutes

Things you will need:
  • Creation Kit. The Creation Kit is the modding tool for Skyrim and can be downloaded for free on Steam.

Note: This is the first part of this tutorial and teaches you what you need to know to add an item to a leveled list. The second part will be more advanced and deal with the types of leveled lists, globals, using leveled lists with containers and NPC's, and other advanced functions.

First off, let me define the function of a leveled list. A leveled list is a list of items that randomly determines which item will be placed into the world, based upon the level of the player. For instance, in the LItemWeaponDaggerBest, you will find a list of items. There are six normal items and one other leveled list. There are also two columns titled "Level" and "Count". The number in the "Level" column determines what minimum level the player must be to get that item, and the number in the "Count" column determines how many of that item the player receives.

For a detailed description of each part of the LeveledItem window, read this wiki page.

In this tutorial, the premise will be that you are creating a new leveled list for all daggers, along with the random chance of finding an enchanted dwarven dagger.

1. Open the Creation Kit and navigate in the Object Window to the Items > LeveledItem category.
2. Create a new Leveled Item.


3. Navigate to the Items > Weapons category and drag the basic, unenchanted dagger of each type into the Leveled Item box.

4. These items have now been added to the list. Now, however, we are also going to add another leveled item to the list.
5. Find the LItemEnchDwarvenDagger and drag it to your new item.

6. The next part is to set the level requirement for each item. When you do this, you need to make sure that the levels are balanced so that the player does not receive overpowered weapons. If the level requirement of the daedric dagger was set to 1, for instance, then the player could find a daedric dagger at the beginning of the game! The best way to find out what level requirement you should give each item is to look at the default leveled items and see how they do it. For this item, we will copy the level requirements for the LItemWeaponDaggerBest leveled list. I will also set the required level for the enchanted dwarven dagger leveled item to 16 so that the player will receive it sometime between when they start finding dwarven daggers, and sometime when they start finding elven daggers.
7. Now you need to decide whether you want to modify the "Count" (the amount of the item given to the player), and if you want to add a "Chance None". Generally only arrows and other bundled items are assigned a Count higher than one. The "Chance None" determines if and how much of a chance there is that the player will not find anything at all. A 50 "Chance None" value will add a 50% that no item will be found, a 20 will add a 20% chance, and so on. Loot leveled items are the most likely to have a chance that no item will be found. I will give this leveled item a 15% chance that the player will not find anything.
8. To test your leveled item, you can use the "Preview Calculated Result" button and the "Preview Level".
9. Your items have been added to the leveled list. Enjoy the outcome. :-)

Part Two:


Part Two (coming soon) will teach you the more advanced functions of leveled lists and their various uses. It will not be written in the step-by-step manner that I have used for previous tutorials, but will be an extended explanation. Check back regularly for sequel.

Saturday, April 7, 2012

WIP Screenshots!

A new Screenshots page has been added to the navbar at the top. Pre-Alpha Way of the Monk content screenshots and teasers are on it, and new pictures will be added as I complete the mod. Check out the page regularly for new screenshots of the WIP mods of our modders!

Sunday, April 1, 2012

EBM Update: 1-4-12

EBM Update:
1-4-12


EBM will soon be available for download, currently I'm waiting for LaggyCreations on deviantART to send me the image files of her ABC for Barbarians. Thanks to her kindness EBM will bring back this awesome book and expand it! As you can see LaggyCreations designed illustrations for the whole alphabet:
Gorgeous, huh? And soon in Tamriel!
I'll make sure to place it in fitting and amusing locations, I already have ideas but I'm not telling, you'll find out on your own. Also most of the books will be found at the Arcaneum and Bards College. There are few ones that are a little more rare, like the tomes 4 and 5 of Males Witches. But you should find them in a quite obvious location it I give you this clue: they're found in the home of a VIP who's more than probably a witch, in a swampy city.

Now there are still some books that you won't be able to find in Tamriel. They are unique and will only be found in Mzahndahrk. Don't search for this Dwemer ruin on your map, it's a new one! With some chance it'll be ready for the release. Actually the level building is about done, it's now a matter of ending to place the furniture and items, and make a nice lighting and effects. I also have to finish the Navmesh (the polygonal floor that tells the AI where NPCs can walk), I'm doing it all by hand because there are quite many gateways and likes that confuse the generator. Big work but not big deal, I find this very interesting to do, paying attention to how I compose the polygons... Within one hour I got the major part of the main room done. I just wish it was possible to copy/paste Navmesh islands. If someone knows how to do this (if it appears it's doable) I'd love to know XD

I also wish I could populate the area a little. After some tests, few troubles I solved quickly *proud* I now have a test fox wandering everywhere, a pacific Sphere centurion patroling (it's adorable) and a certain Dunmer named Sothis Andas whose action so far consist into pouring himself some mead, sitting on a chair, playing the lute (it doesn't make sounds), reading a book, ...well few minor actions that loop. Easy as fun.
Next step will be giving Sothis some dialog. I'd like to see if I can give some dialog to the Sphere as well.

Today I've also proceeded to completing book series such as the 2920, Wolf Queen, Mystery of Talara, Dance in Fire, etc... that are for some unexplicable reason incomplete in Skyrim. This makes a litlle more than 20 more books. I plan to add more books from Morrowind and Oblivion.
For now I've also sorted all the books (over 235), it took me a little time as there were few ones I hadn't read already, or had read in French... but in the end they are classified by topic and will be found in dedicated shelves. Seeing the amount of book, seeing there are MANY that can be added from Morrowind and Oblivion, I can say that the hundreds of bookshelves found in the library will be well employed XD
I consider having to move the library to a seperate cell in case it's heavy perf-wise. For now it's smooth on my laptop.

Tuesday, March 27, 2012

Hint: Creating textures fitting in Skyrim

You have seen mods that either retexture items or add new ones in the game. And maybe you've noticed how some textures stand out like they come from outer space or whatever funky world that is NOT Tamriel. If you've never notice this then I suggest you to either look carefully the exemple or avoid doing any texturing job.

Textures are extremely important. You can screw the modeling, you can screw the level building, but do not screw the texturing! Textures are what you see all the time, if you screw them you screw the game. They are not the only thing that can screw the game of course, but we're talking about textures.

Skyrim was created with a graphic chart including a certain range of colors only to fit the rugged, cold, snowy place. It's not for nothing that we never see bright red big flowers. Even the crimson nirnroots aren't bright red:


So, which picture should be your reference for texturing a crimson nirnroot?


Skyrim uses mostly desaturated colors, almost grey for most of them. Now it's not always easy to figure if your desaturated colors will fit in the game. However note that you shouldn't just take screenshot of the game and use the colors of the screenshots as they are altered by the game engine's post process.
So how to do? Well, simple trick:
  1. Find items in the games that feature the colors you want to use
  2. Get their textures
  3. Pick the colors directly

If you can't find items with such colors, then maybe you shouldn't use them in the first place and go for other colors. If you want to extract textures from the game you will need a specific tool (see here for info and links).

Now if you want to expand a type of items already existing in the game, such as weapons and armors, to create maybe new variations within an existing set, or a new kind of weapon like staves in exemple. I cannot smith a staff in Vanilla Skyrim, it would be cool to smith some glass, elven or ebony staff!
...Okay... But before going wild, OBSERVE the existing weapons!
  1. Look their designs, see what are the smilarities between a dagger and a bow, between a sword and a mace, etc.
  2. Look if they have specific patterns in their textures, specific shapes in their modeling.
  3. When you're able to tell what are the graphic codes of a weapon set, you can start designing.
  4. Then submit your drawing on a forum to get feedback and advice.
  5. Eventually fix it before starting modeling and texturing.

It is very important to not neglect feedback. Unless you're doing a mod just for yourself you should get sure that your audience will like what you propose. Plus if people are aware of what you do you have more chances to get the audience you deserve!

Finally, here's a graphic review I made. I guess a concrete exemple speaks better.

You see the difference? Before and after?
(If not, maybe you shouldn't do any texturing for the moment)

You may also read this great post from Martigen on Bethsoft, gathering advice from Martigen and many other texturers who contributed to the thread. The main focus is texture compression and I found this post extremely interesting, both technical and professional.


Sunday, March 25, 2012

Way of the Monk: Unarmed Overhaul, Mod Diary #2

Mod Diary #2

Pillars:

So, after tens of hours of studying Papyrus, posting questions on forums, and writing nearly one thousand lines of codes with around one hundred properties, I have finally completed the scripts for all of the Pillars that manage your stats in the mod. Not only that, but they all work! One of them is a tiny bit glitchy, but I aim to fix that soon. These Pillars of the Way will be used to manage and check your perks, stats, and skill inside the mod. For ease, you will also be able to use Balls of the Way (misc. items with the model of an Attunement Sphere) that have the same functions. These Pillars were vital for the work on the other mod to allow for proper testing and smooth use. They have also been added to the world and given a map marker for fast-traveling. Along with the completion of the Pillars, I have also completed every perk that the player can gain from leveling. 

There are some other Pillars that the player can find around the map (similar to the Standing Stones) that have not been completed, but they are next on my list. 

Enchantments and Focus Crystals:

They have not all been added yet, but I have decided upon them all and know for the most part how I am going to add them to the game. There is still some uncertainty on how to make Gauntlets that are both a piece of Armor and a Weapon, but I think I may have found a way to create them by mimicing the way shields work in the game.

Tutorials:

Along with all of this tedious scripting, I have learned a great deal about Papyrus and the CK. In the next few days I will post tutorials on making message box sequences, new skills, and (once I figure it out) weapons that are also categorized as armor.

Screenshots:

Pillar of Rewalking (allows you to reset your perks):


Archway to lead the player to the Pillars of the Way:


Pillars of the Way:


Wednesday, February 22, 2012

Tutorial: Adding Images to Skyrim Books


Object: To add an image to a Skyrim book through the Creation Kit.

Difficulty: Easy

Time Needed: 10 minutes at most; much less once you get used to the process

Things you will need:
  • The Creation Kit. The Creation Kit is the modding tool for Skyrim, and can be downloaded from Steam.
  • Some previous understanding of the Creation Kit (preferably).
  • The image you want to add (I would suggest that it be a simple image with a clear background).

1. Download or find the image that you want to add to the game.
2. Navigate to the Skyrim Data folder. This will be in the install directory for Skyrim, which usually is at Program Files > Steam > steamapps > common > skyrim > Data, and find the Textures folder.
3. Create/find folders in the following order: clutter > books > images.

4. Copy/move the image you want to use into this directory. I used a image named "Sakin_04.png" as an example.


5. Open the Creation Kit and load the appropriate data files.
6. In the Object Window, navigate to the Items > Books category.
7. If you want to add the image to an existing book, then find the one you want, and double-click on it. If you want to create a new book, then find a book with the world model you want to use, and change the info and model to what you want it to be. The reason for this is that simply creating a 'New' book will mean that you have to add a world model to it. This is a large hassle if you are just trying to create a book without a unique appearance.
8. Next, add the code:  <img src='img://Textures/clutter/books/images/your_picture.png'>  but replace "your_picture.png" with the filename of your image.
9. Click 'OK' to save, and click 'Yes' when a prompt asks you if you want to "create a new Form".
10. Save your mod.
11. Next, you will need to test your mod. Start Skyrim.exe, select your mod, and (preferably) deselect all others. Start the game.
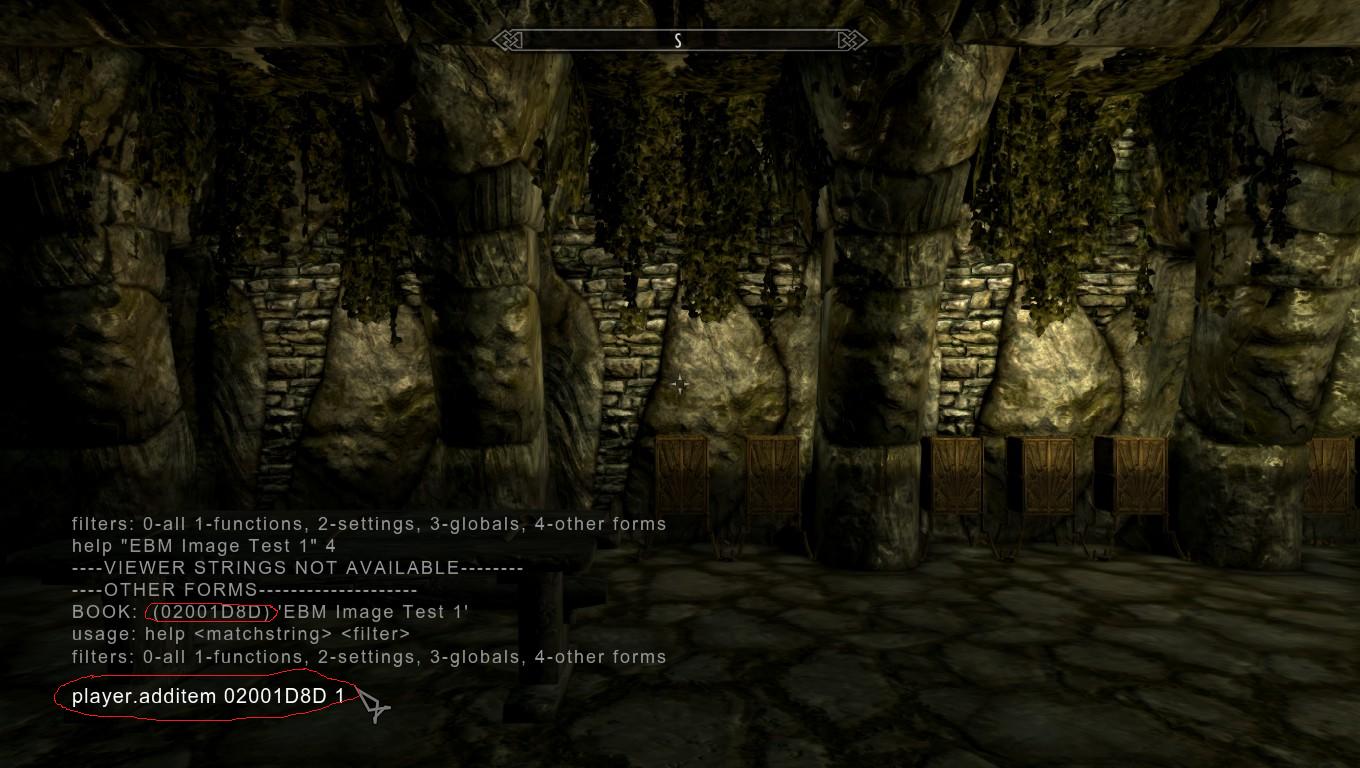
12. Once you get to the Main menu, either load a clean save, or type the following into the console: coc QASmoke . This code places you into the Skyrim testing room with a default Nord character. To bring up the console, press the "tilde" (the ~ character) on your keyboard.
13. Type  help "Your Book Name" 4    into the console. Replace "Your Book Name" with the 'Name' of your book. Make sure to not use the ID, but the actual Name. Doing this will give you the code to add the book into your inventory.

14. Type player.additem itemcode 1 into the console, but replace "itemcode" with the code that you get from the console. This should add the book into your inventory
15. Open your inventory and find the book.
16. Open the book and turn to the page where the image should be. If all worked correctly, then you should see the image.


Notes/Possible Bugs:

If the image was not in the book, then there are a number of possible reasons.

1. The image type may be foreign to the CK. I do not know all of the filetypes that the CK recognizes, but all of the default images are .png images. I would suggest that you make sure your image is in the .png format.
2. The code in the book may have been input incorrectly. Make sure that it accurately details the address of the image. Also, make sure that the address starts from the Textures directory, rather than the Data directory or the hardrive's main directory.
4. The code could have been written in a format other than the one accepted by the CK. You must use
specific fonts in the CK. You must make sure and use:
['] and not [’] (the second one has a slight curve)
[" "] and not [“ ”] (the second ones are slightly curved as well)
[...] and not […] (the second one is only one character composed with the alt+0133 code in spite of 3 dots)

5. The image may not have been added into the mod's archive. The CK is supposed to automatically add any new files to the archive, but it may have failed. If the code was correct, then try adding the file manually to the archive. You can do this by going to the File menu in the CK and selecting 'Create Archive'. A window will pop up with horizontal slots in it. Drag-and-drop your image from its folder into this window and click 'Pack Files'. Save the mod, and test it again.

(next part added by nox.fox)

The image may appear scaled down. As you can see on the screenshot below, no matter the size of the picture, by default the image is scaled down (click the images to see their original sizes).

So in order to solve this out you must add height and width information in the image tag. These information are the size in pixels of your image. You can find these information either in the properties of your image file (right click>properties) or in any image editing software like Photoshop.
  • <img src='img://Textures/Interface/Books/Daedric Artifact book/Daedric Artifac00.png' height='471' width='296'> (replace the numbers by the right height and width size of your picture)
  • Note that the size of a picture in its properties is given like 296x471 where 296 is the width and 471 is the height. However in the tag the information make sure you indicate the height and width information in the appropriate field or the image will be distorted like on the second picture below (nox.fox: where I forgot to correct the image path after changing the size information).
  • Also note that 296x471 is the maximum size of a picture. A larger picture will still be displayed but all the pixels out of the 296x471 area will be hidden.
  • You can purposely input wrong numbers to scale your image. In example, if your picture is 40x60px large, you can input height='120' width='80' and it will appear 2 times bigger in the book. While this trick can allow the creation of smaller files with a smaller weight I don't suggest to do this in hope to reduce the weight of your files. It would be interesting if you had to make your files fit on a DVD with limited storage for a whole game but we don't have this problem as modders. Also since illustrations are only displayed when the book is opened it won't affect the performances. But I'm just saying that if you want to do something like this, it's possible!
  • Images cannot be centered with the <p align="center"> tag. If you want your image centered you should set the width to 296.


Packing your images in a .bsa

In order to share your mod you might have to manually create a .bsa. Normally the CK creates the .bsa automatically when you upload it on Steam, but sometimes it might not work. Or maybe you don't want to put your mod on Steam but still want to share it with friends or teamworkers.
In this case, here is a way to do it quickly in a few clicks. Click the image below to enlarge the tutorial.


Feedback:

If you have any comments/questions, or would like to request a tutorial, then please feel free to leave a comment. I will answer your question as quick as I can. If you request a tutorial, I'll let you know when/if you should expect your request to be fulfilled.