Object: To add an image to a Skyrim book through the Creation Kit.
Difficulty: Easy
Time Needed: 10 minutes at most; much less once you get used to the process
Things you will need:
- The Creation Kit. The Creation Kit is the modding tool for Skyrim, and can be downloaded from Steam.
- Some previous understanding of the Creation Kit (preferably).
- The image you want to add (I would suggest that it be a simple image with a clear background).
1. Download or find the image that you want to add to the game.
2. Navigate to the Skyrim Data folder. This will be in the install directory for Skyrim, which usually is at Program Files > Steam > steamapps > common > skyrim > Data, and find the Textures folder.
3. Create/find folders in the following order: clutter > books > images.

4. Copy/move the image you want to use into this directory. I used a image named "Sakin_04.png" as an example.

5. Open the Creation Kit and load the appropriate data files.
6. In the Object Window, navigate to the Items > Books category.
7. If you want to add the image to an existing book, then find the one you want, and double-click on it. If you want to create a new book, then find a book with the world model you want to use, and change the info and model to what you want it to be. The reason for this is that simply creating a 'New' book will mean that you have to add a world model to it. This is a large hassle if you are just trying to create a book without a unique appearance.
8. Next, add the code: <img src='img://Textures/clutter/books/images/your_picture.png'> but replace "your_picture.png" with the filename of your image.

10. Save your mod.
11. Next, you will need to test your mod. Start Skyrim.exe, select your mod, and (preferably) deselect all others. Start the game.
12. Once you get to the Main menu, either load a clean save, or type the following into the console: coc QASmoke . This code places you into the Skyrim testing room with a default Nord character. To bring up the console, press the "tilde" (the ~ character) on your keyboard.
13. Type help "Your Book Name" 4 into the console. Replace "Your Book Name" with the 'Name' of your book. Make sure to not use the ID, but the actual Name. Doing this will give you the code to add the book into your inventory.

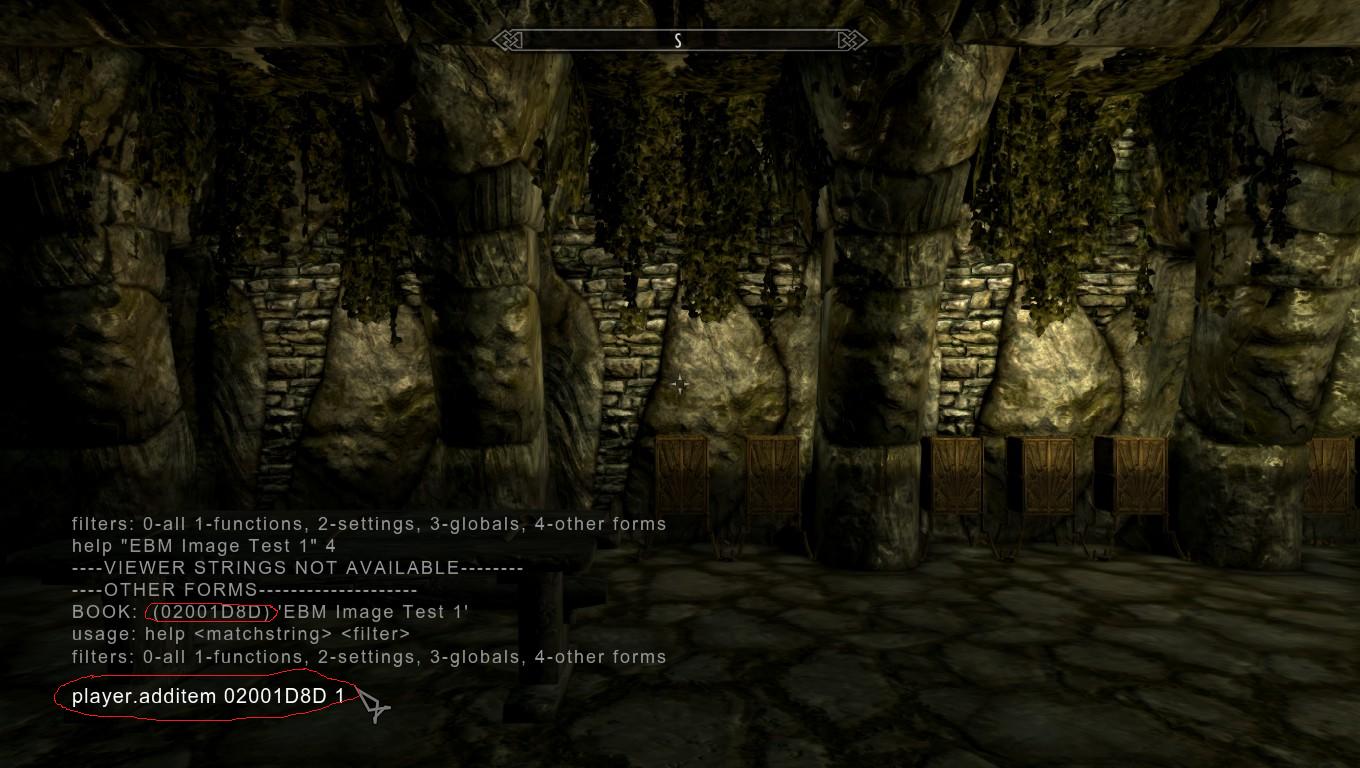
16. Open the book and turn to the page where the image should be. If all worked correctly, then you should see the image.

Notes/Possible Bugs:
If the image was not in the book, then there are a number of possible reasons.
1. The image type may be foreign to the CK. I do not know all of the filetypes that the CK recognizes, but all of the default images are .png images. I would suggest that you make sure your image is in the .png format.
2. The code in the book may have been input incorrectly. Make sure that it accurately details the address of the image. Also, make sure that the address starts from the Textures directory, rather than the Data directory or the hardrive's main directory.
4. The code could have been written in a format other than the one accepted by the CK. You must use
specific fonts in the CK. You must make sure and use:
['] and not [’] (the second one has a slight curve)
[" "] and not [“ ”] (the second ones are slightly curved as well)
[...] and not […] (the second one is only one character composed with the alt+0133 code in spite of 3 dots)
5. The image may not have been added into the mod's archive. The CK is supposed to automatically add any new files to the archive, but it may have failed. If the code was correct, then try adding the file manually to the archive. You can do this by going to the File menu in the CK and selecting 'Create Archive'. A window will pop up with horizontal slots in it. Drag-and-drop your image from its folder into this window and click 'Pack Files'. Save the mod, and test it again.
(next part added by nox.fox)
The image may appear scaled down. As you can see on the screenshot below, no matter the size of the picture, by default the image is scaled down (click the images to see their original sizes).


So in order to solve this out you must add height and width information in the image tag. These information are the size in pixels of your image. You can find these information either in the properties of your image file (right click>properties) or in any image editing software like Photoshop.
- <img src='img://Textures/Interface/Books/Daedric Artifact book/Daedric Artifac00.png' height='471' width='296'> (replace the numbers by the right height and width size of your picture)
- Note that the size of a picture in its properties is given like 296x471 where 296 is the width and 471 is the height. However in the tag the information make sure you indicate the height and width information in the appropriate field or the image will be distorted like on the second picture below (nox.fox: where I forgot to correct the image path after changing the size information).
- Also note that 296x471 is the maximum size of a picture. A larger picture will still be displayed but all the pixels out of the 296x471 area will be hidden.
- You can purposely input wrong numbers to scale your image. In example, if your picture is 40x60px large, you can input height='120' width='80' and it will appear 2 times bigger in the book. While this trick can allow the creation of smaller files with a smaller weight I don't suggest to do this in hope to reduce the weight of your files. It would be interesting if you had to make your files fit on a DVD with limited storage for a whole game but we don't have this problem as modders. Also since illustrations are only displayed when the book is opened it won't affect the performances. But I'm just saying that if you want to do something like this, it's possible!
- Images cannot be centered with the <p align="center"> tag. If you want your image centered you should set the width to 296.


Packing your images in a .bsa
In order to share your mod you might have to manually create a .bsa. Normally the CK creates the .bsa automatically when you upload it on Steam, but sometimes it might not work. Or maybe you don't want to put your mod on Steam but still want to share it with friends or teamworkers.
In this case, here is a way to do it quickly in a few clicks. Click the image below to enlarge the tutorial.

Feedback:
If you have any comments/questions, or would like to request a tutorial, then please feel free to leave a comment. I will answer your question as quick as I can. If you request a tutorial, I'll let you know when/if you should expect your request to be fulfilled.
would you happen to know the max size of the pages of the books in skyrim? the pictures i want to add i want them to take up as much of the page as possible like your image up there on the right page..so if you could add in the max size you could scale your picture to that would be great man!
ReplyDeletethanks,
lynxsrevenge@gmail.com
also, i have the code right,and the images are all png and i even archived them...but all im getting is a rainbow colored IMG: on every page...uh..cant figure it out!
ReplyDeleteHow did you make the rainnow IMG: dissapear?
DeleteI have same problem and I can't figure it out ._.
First, do check that your code line is complete and without a single mistake (spelling, tags, link to the picture). If everything is written properly and the link is correct, you can make a small check to be sure your code is good: change the link of your picture with the link of an existing image from the game. It should probably appear distorted if you didn't change the height and width tags. If the image appears it means your code is right.
DeleteIf the game still can't find the image it may be:
Because you didn't write the link properly.
Because your image is not stored in a folder belonging to your Skyrim/Data folder.
Normally you shouldn't need (for testing) to archive the image in a bsa, but you may try to create one to see if it solves the problem. To do this, you just need to go in the CK, to the file menu, and click the option related to packing an archive. A window will pop up, then you just have to drag and drop your image (or the folder containing the images) on this window. Pack the archive, it should be very very quick. Then launch the game and see if it works.
Nevermind..got it to work...and the 471x296 is the full page..woohoo...also skyrim recognizes .jpg format (but you cannot pack them in an archive,the creation kit doesnt seem to like them as much as the game!)
ReplyDeleteThank you so much for this tutorial!!! <3 It helped me so much in making my first ever mod. I was wondering if you knew how I could place the book into the game so I could put it on the steam workshop for other people to read? Thanks again for all the help!
ReplyDeleteOnce you've made the book, find a cell to put it in and go to where you want to put it. Then drag the book from the Object Window into the Render Window. To upload a mod, click 'File' and 'Upload File to Steam Workshop'. For nagivating the Render Window and finding a cell, I would suggest watching the official Creation Kit Tutorial videos on Bethesda's Youtube channel.
DeleteWhen you've uploaded the mod on Steam, don't hesitate to give us the link =) When you've packed your mod you should also see a .bsa file with the same name as the .esp file of your mod (those files are found in C:/Program Files (x86)/Steam/SteamApps/common/skyrim/Data).
DeleteIf you copy them both (.esp and .bsa) in a zipped folder you can also easily post your mod on the Nexus and get an even broader audience (many players prefer to mod their game through the Nexus rather than through Steam)
If you need any more help, feel free to ask =)
I really don't know what I would have done without you guys thank you so much!!!! Here's my book on steam workshop if you want to take a look I would love the feedback http://steamcommunity.com/sharedfiles/filedetails/?id=90887805
Delete@Isaac It saved as a .esp and a .ckm (I don't even know what that one is) do I zip those 2? If not how do I save as a .bsa? Thanks again!!
I have a problem: My clutter folders are missing. The creation kit can still see and load clutter perfectly, but I can't find them on the computer.
ReplyDeleteIf you're looking for textures then this is normal. The textures (including clutter textures) are stocked in "Skyrim - Textures.bsa" in the Data folder. To access them you will need a bsa extractor, there are some listed in this thread: http://forums.nexusmods.com/index.php?/topic/582028-extracting-bsa-files/
DeleteI hope it solves your problem, if not, give us more details :)
Okay I'm having the same problem as that Lincoln guy, but I tried using BSAopt and I have no clue what I'm doing, how do I just open the folder? There are two folders with textures, Skyrim - Textures, and Textures, and the -textures one has a clutter folder in it when I open it with BSAopt... What the heck am I supposed to do?
ReplyDeleteIf you are using your own images, you can just create the folders yourself. Extracting the .bsa will give you both the folders and the original book images, but you may not need those.
DeleteGo to your Data > Textures folder. Create a folder named "clutter". Go into that one, and create a folder named "books". Finally, go into that one and create a folder named "images". Put the images that you want to use into that folder. Double-check that their names are spelled correctly. You should now be able to use any images in that folder for your books. This is an easy way to fix your issue that does not require any extraction or tools.
If you plan on making large or innovative mods, you might as well go ahead an learn BSAOpt, though. It is likely that you will need it at some point in the future of your Skyrim modding.
Here is a tutorial for BSAOpt: http://stepupdates.blogspot.com/2012/02/bsaopt.html
I tried this, and i get it in my game, but my subscribers can't see it... What should I do?
ReplyDeleteMake sure and include the image within your .bsa under the right file hierachy. For book images this is ://Textures/clutter/books/images.
DeleteWhen you have a working file or script, but your subscribers do not, then this almost always means that it is either not in the .bsa, or is in the wrong place. The Creation Kit is supposed to build the archives automatically, but it doesn't always get everything. Try using archive.exe in the Skyrim folder. It is the program that the Creation Kit uses to build the BSAs, but it running the .exe lets you build them manually. There are many tutorials on using the archiver around the web, but we do not have one of our own. You should be able to find several tutorials with a Google search for "manually build .bsa archive"
It must be a bsa issue indeed. I'll try to update the tutoriel tomorrow concerning this issue, but if you open the CK and click on File, you should see an option called something like "compress archive" or so. If you click it, a window should pop up with a blank table. There you can drag the image files from your Texture/clutter/books/[your mod name] folder and drop them in the blank table. Down the table there should be a button. When you click it it should create a bsa containing the images.
DeleteWith this, everything should work fine when you upload your mod on Steam. If you want to upload it on the Nexus don't forget to include the .esp and the .bsa in your mod archive.
I did drag them to the archive but my friend who tested it for me didn't get the images to show up. I dragged the individual images, and they showed up with the correct folder path, but not in the subscribe-able plugin. I'll try the manual thing next, and keep you up to date. The plugin is in my URL, so click "Wes Lesley" to go there, and subscribe to it so you can take a look. Maybe you'll spot something I missed.
DeleteI can't find the textures folder! help please!
ReplyDelete(I'm on the french version)
C'est normal, contrairement à ce qu'on avait pour Morrowind et Oblivion, les textures de Skyrim sont stockées dans une bsa. Il te suffit néanmoins de créer un dossier Textures dans le répertoire Data de Skyrim, et d'y placer un dossier contenant tes propres textures. Lorsque tu finaliseras ton mod tu pourras stocker tes textures dans une bsa comme indiqué dans le tutoriel en bas de cet article.
DeleteSi tu veux avoir accès aux textures originales de Skyrim il te faudra utiliser un extracteur de bsa comme FO3Archive, facilement trouvable avec Google.
J'espère que ça répond à ta question =]
Merci! ;)
DeleteC'est tout à fait ce que je voulais savoir! :)
Euh une autre question au passage : j'avais fait un mod avec un autre livre mais je n'arrive pas à le publier sur le Steam Workshop, il m'affiche un message d'erreur...
Et ce livre ne contient que du texte, pas d'images...
Help!
Pourrais-tu donner plus de détails sur ce message d'erreur ? Est-ce que le livre apparaît bien dans le jeu ? Que se passe-t-il en l'ouvrant ? As-tu une idée de ce qui peut être à la source du bug ?
DeleteJust seeing this now. Shawn, thank you very much for this. You've helped me immensely.
ReplyDeleteI wonder if you have any advice for getting an image onto the very first page. I've reduced my images to no greater than 296 wide, which makes them 444 tall. There are two images, but the book consistently leaves that first page blank, and I'm trying to get them to open together. They are to be the only two pages in the book, and I'm trying to get them both to be visible at the same time.
Any help would be greatly appreciated.
Two questions:
ReplyDelete1) My images are 1600x1000 and downgrading the resolution makes them unreadable. How can I make the book utilize my large resolutions?
2) I've tried dragging and dropping my PNG images into the Create Archive but they just won't go in. Nothing drops. My file just stays empty. I really need help with this now and I see the last post is a year ago, so I REALLY hope someone gets this.
1) I'm afraid the only thing you can do would be to try cutting your picture in two, vertically, so you get two portrait formats instead of a landscape one. Then put a pic on a page, and the other on the next page. Make sure your pictures are at the right maximum dimensions (296x471) before adding them to the book so they won't be resized nor distorted.
Delete2) Sometimes the archiving just fails. I often needed to try three times in a row to have my files actually archived. Also make sure you drop the files from your mod folder, in your Data folder.
I hope this helps...!
Great article Lot's of information to Read...Great Man Keep Posting and update to People..Thanks Releases New Children's Book.
ReplyDeleteI think this is an informative post and it is very useful and knowledgeable. therefore, I would like to thank you for the efforts you have made in writing this article. children moral
ReplyDeleteThank you for this post! My images are not loading in game, the game freezes until I hit "escape" are my images to high res?
ReplyDeleteYou can try reducing the resolution of the images (do check the tutorial's part about size of the pictures), but if that doesn't solve it, there might be an error in the code, or with the book itself. To troubleshoot that, you could try adding the images to a book which you know doesn't pose any problem: that'll give a clue as to whether the bug comes from the image or from the book.
DeleteThank you nox fox, for taking time to comment :) I tried adding the images to a working book folder, still no dice, I reduced the size of the images also, I will have another crack at it tonight, making fresh images :)
DeleteThank you!!
ReplyDeleteGreat article, totally what I was looking for.
ReplyDelete